 The new Micro 1 x 2 tying forceps with thumb lock from Laschal
![]() Anastomotic wound management in the oral cavity has always presented unique ergonomic challenges. Delicate mucogingival closures in tight, confined surgical sites, demanding two sets of hands holding assorted retractors, suction apparatus, forceps, and needle holders, often lead to frustration at the end of a perfectly performed procedure. Add to that mix, a fresh suture with its full 18″ length, and we have an additional challenge. Do we transfer the needle to the fingers of our non-dominant hand for convenience, or do we follow standard surgical protocol and transfer the needle to a forceps?
Anastomotic wound management in the oral cavity has always presented unique ergonomic challenges. Delicate mucogingival closures in tight, confined surgical sites, demanding two sets of hands holding assorted retractors, suction apparatus, forceps, and needle holders, often lead to frustration at the end of a perfectly performed procedure. Add to that mix, a fresh suture with its full 18″ length, and we have an additional challenge. Do we transfer the needle to the fingers of our non-dominant hand for convenience, or do we follow standard surgical protocol and transfer the needle to a forceps?
- While transferring the needle to a forceps limits control over the needle, which may slip or spring out of the prongs, and requires continuous finger pressure to maintain its grasp, it remains the recommended method.
- While convenient, transferring the needle to our fingers may result in the puncture of gloves or skin. It also puts the needle and fingers at least 16″ away from the tail end of the suture, making an instrument tie a bit more difficult. Also, any small needle presents its own difficulties.
The challenge, therefore, is to create an instrument and method of use that will safely and securely hold any size suture while at the same time facilitating and making the anastomosis more ergonomic.
The new micro 1 x 2 tying forceps with thumb lock from Laschal, coupled with a slight change in standard procedure, solves both issues.
- Grasp the forceps in the non-dominant hand so that the thumb is positioned on the riveted portion of the thumb lock, and the middle finger is positioned above the hole that will receive it.
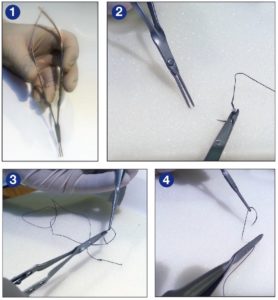
- Use the tips of the forceps to firmly and gently grasp the tissue and the needle holder to complete the passage of the needle through both sides of the anastomotic site.
- Transfer the needle to the forceps by grasping the suture just distal to the needle. The forceps are so well engineered that it will firmly hold a 12-0 suture. By doing so, the needle is not firmly affixed to the forceps and will dangle. This is advantageous because any contact [of the needle] with drapes, gloves, or skin will not cause any puncture or destabilization.
- Squeeze the forceps tightly so that the thumb lock is engaged, and draw the suture to its most maximal and comfortable length to facilitate anastomosis.
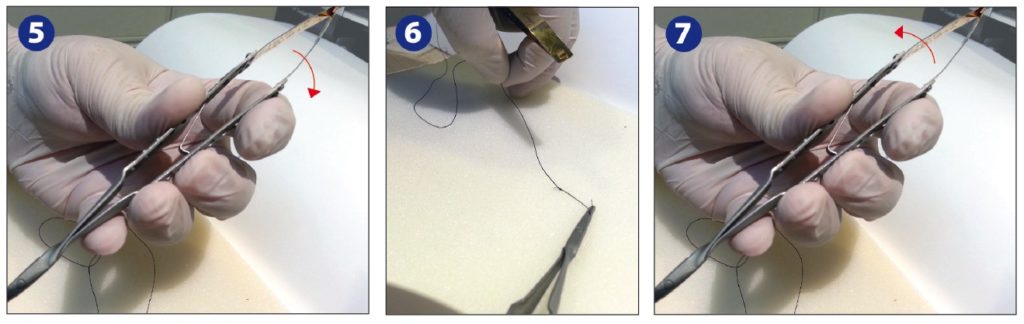
- Rotate the forceps in your hand so that the back end of the spring is positioned close to and points to the anastomotic site. This improves ergonomics by greatly reducing the length of the suture in preparation for the first instrument tie.
- Complete the knots, using the freed-up thumb and index finger for manipulation, and trim the suture in preparation for the next instrument tie.
- Rotate the forceps back to its original position, transfer the needle back to the needle holder, and repeat the process for all additional instrument ties.


Come see Laschal Surgical, Inc. at AAE booth No. 206.
Stay Relevant With Endodontic Practice US
Join our email list for CE courses and webinars, articles and more..
