Dr. Barry H. Korzen offers insight to ensure proper completion of the endodontic instrumentation
 In aeronautics, the Glide Path is the approach path of an aircraft when landing, usually defined by a radar beam. Its purpose is to establish a tightly controlled horizontal and vertical “corridor” that will take the incoming aircraft to the proper location at the end of the runway.
Have you ever been on a commercial flight where immediately after touchdown all the passengers begin clapping? It’s the response to a job well done by the pilot.
To ensure that you get that same “well done” feeling when you complete your endodontic cases, a vital step in the instrumentation process is preparation of the Glide Path to allow all subsequent instruments to move smoothly from the coronal orifice of the canal in an unimpeded progression to the apical constriction.
With some cases, once proper access has been created, all that is necessary is to confirm that the canal is ready for cleaning and shaping. But with teeth with large restorations, especially in older patients, it isn’t unusual to find that the natural defense mechanisms (e.g., pulp stones, the formation of reparative dentin creating a narrowing of canals, etc.) that have kicked in while the pulp was trying to recover from long-term irritants have now become an impediment to successful endodontic treatment. And properly establishing the Glide Path, even though time consuming in those difficult-to-treat cases, will help ensure that proper completion of the endodontic instrumentation is achievable.
And just as turbulence can cause an aircraft to veer off its Glide Path, in endodontics the lack of a properly established glide path will often lead to ledge formation, transportation of the natural canal anatomy, and blockage of the canal with dentin debris, or a combination of all three negative consequences.
As Dr. John West states in his excellent Dentistry Today article entitled, “The Endodontic Glidepath: ‘Secret to Rotary Safety,’”1 “without the endodontic Glidepath, the rationale of endodontics cannot be achieved.”
Just as the preparation of the Glide Path lays the groundwork for the proper shaping of the canal, proper access preparation is an essential precursor for identifying the canal orifice(s) and the subsequent preparation of the Glide Path.

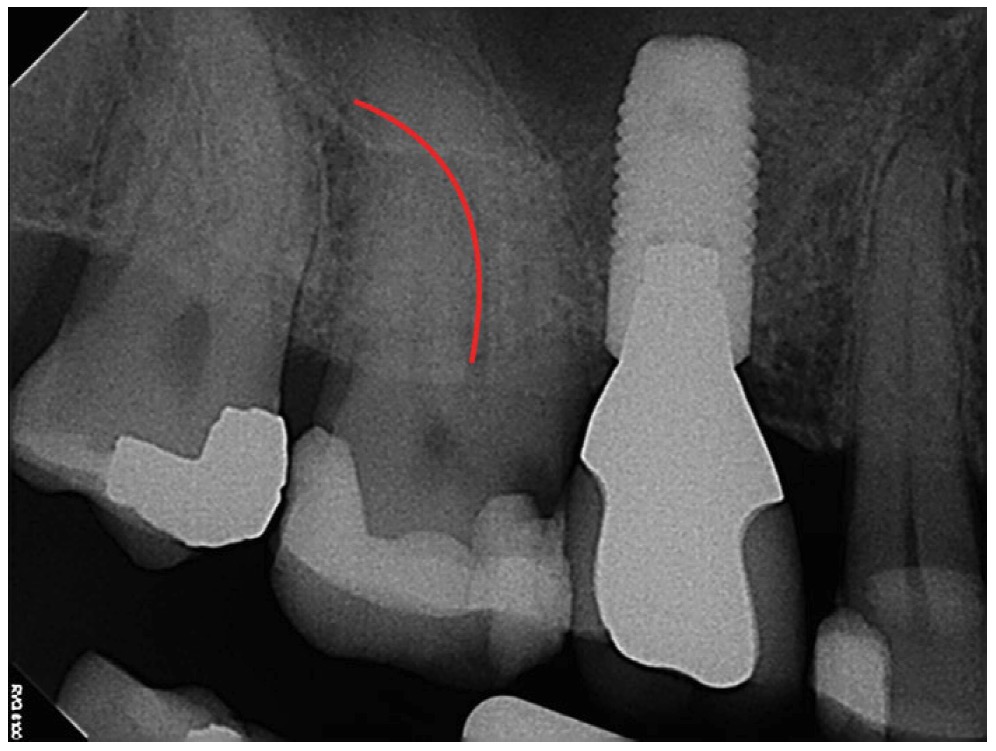
Once the canal orifices have been identified, and before placing a single instrument into the canal, study the pretreatment radiograph carefully. Even though the radiographic and physiologic termini of the canals likely do not correspond exactly, understanding what problems you might encounter when negotiating the canals will help you plan the most efficient technique to overcome these potential impediments to successfully creating an effective Glide Path. These are some questions to ask for that determination:
- Are the roots curved, and if so, to what degree (Figure 1)?
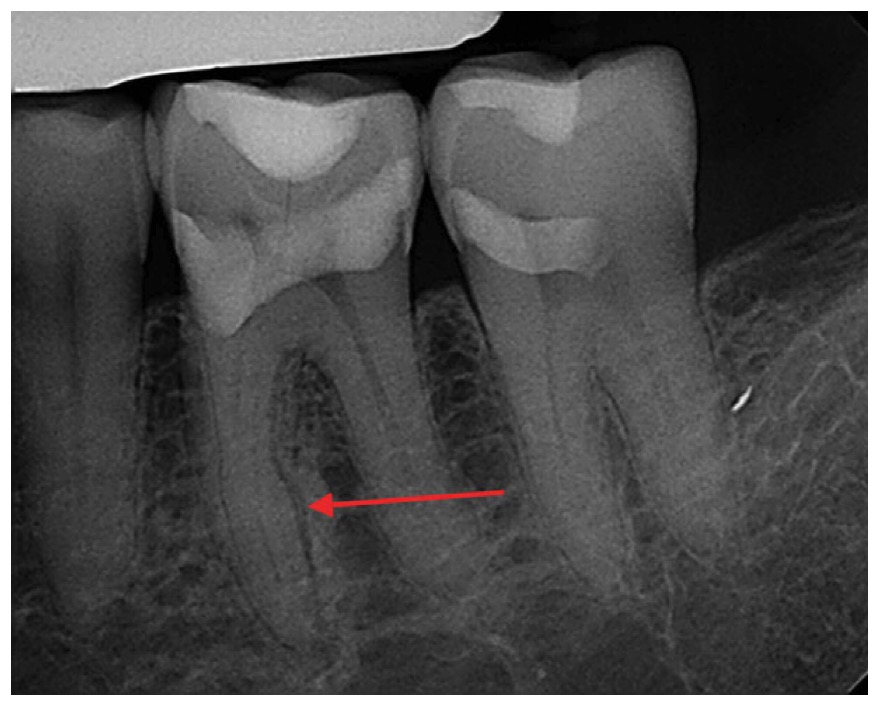
- Does the canal space disappear on the radiograph, and if so, in the apical third or more coronally (Figure 2)?
- Is there a radiolucent lesion, and if so, at the radiographic apex or somewhat removed from the apex (Figure 3)?
Technique
Throughout Glide Path preparation and subsequent shaping of the canal, copious irrigation should be maintained. Sodium hypochlorite is the irrigant of choice and is best combined with a carbamide-peroxide and EDTA-containing gel.2 The EDTA chelates calcium salts from calcified areas within the root canal, and due to its effervescent properties, it allows for pulp tissue, dentinal shavings, and debris to be easily removed, facilitating the movement of the instruments down the canal.

appearance of the root
Initiate the preparation of the glide path using a pre-curved No. 10 stainless steel K-type hand file that matches the canal curvature obtained from the preoperative radiograph (Figure 4).
If canal constrictions prevent the No. 10 K-file from easily reaching the estimated working length (EWL), use a No. 08 K-file along with copious irrigation until it easily reaches the EWL. Because the No. 08 is not as stiff as the No. 10, whatever prevented the No. 10 from reaching the estimated working length initially may distort the No. 08, and you may require a number of instruments to achieve your goal. You may even have to resort to using No. 06 instruments to ensure that you remain within the natural canal and are not creating your own pathway. Try the No. 10 K-file again, and if it reaches the EWL, continue using the No. 10 until it easily reaches the EWL. To facilitate the removal of debris, especially in long and narrow canals, it may be necessary to alternate between the No. 08 and No. 10 files.
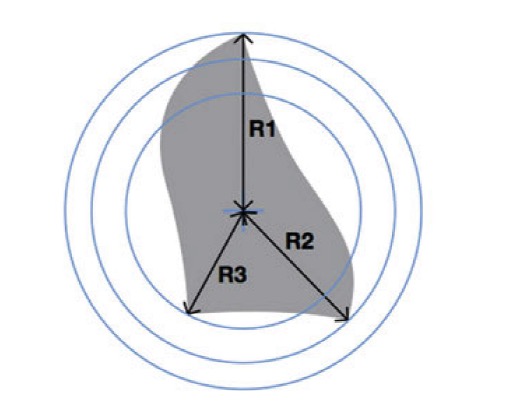
In narrow canals, meticulously creating the Glide Path has historically been a slow and tedious procedure. Once a No. 10 K-file is worked to the EWL, Z-Pathfinder3 nickel-titanium engine-driven files, which have an innovative design comprised of cutting edges on three different radii that leave a large and efficient area for debris removal, and increased flexibility due to their small diameters (No. 12 and No. 17) and their slight .03 taper, quickly and efficiently complete the preparation of the Glide Path (Figure 5).
The Pathfinders are used by slowly progressing apically without pressure. When resistance is encountered, remove the file from the canal, place a small amount of RC Cleaner in the canal, irrigate with sodium hypochlorite, and again progress slowly toward the apex using the Pathfinder file. In most cases the use of the P1 file with its .12 apical tip will be sufficient to allow the placement of a No. 15 K-type file to the EWL. If this is not the case, complete the Glide Path preparation with the P2 Pathfinder. Its .03 taper and No. 17 apical tip size will create a canal shape that will permit the effortless placement of the No. 15 K-type file (.02 taper and No. 15 apical tip size) to the EWL, and this is important as the No. 15 is the minimum size apical tip that can be properly verified on a radiograph (Figure 6).

Every step in endodontic instrumentation is important in order to achieve the desired end result. However, creating the correct Glide Path for the canal you are treating will make each of the remaining steps in your treatment protocol that much easier to perform, resulting in a cleaner and well-shaped canal that can be ideally obturated. The time you take in preparing the Glide Path will pay dividends, especially when you step away from the chair and know that your job was “well done.”
 A graduate of the University of Toronto Faculty of Dentistry and the Harvard University graduate endodontic program, Dr. Barry Korzen is the Founder of The Endo Academy (www.TheEndoAcademy.com) and Zendo® (www.Zendo-online.com). He was an Associate Professor, Assistant Dean, and former Head of the Discipline of Endodontics at the University of Toronto Faculty of Dentistry. Besides authoring numerous papers, Dr. Korzen has spoken to dental societies and organizations around the world and has delivered lectures at more than 20 universities. He has received fellowships from the American College of Stomatologic Surgeons, the International College of Dentists, and the Pierre Fauchard Academy. Dr. Korzen is a Past-President of both the Canadian Academy of Endodontics and the Ontario Society of Endodontists and has been a longstanding member the American Association of Endodontists.
- West J. The Endodontic Glidepath: “Secret To Rotary Safety.” Dentistry Today. September 10, 2010. https://www.dentistrytoday.com/endodontics/3478-endodontic-glidepath-secret-to-rotary-safety. Accessed June 16, 2015.
- Zendo RC CLEANER. Zendo-online.com. https://zendo-online.com/products/98/Zendo%20RC%20Cleaner. Accessed June 16, 2015.
- Zendo. Zendo-online.com. Zug, Switzerland. Accessed June 16, 2015.
Stay Relevant With Endodontic Practice US
Join our email list for CE courses and webinars, articles and more..
